 Document Management
![]()
 Overview
Document Management is a core feature of OpsAdmin, designed to support the highly regulated nature of the retail energy industry by ensuring accurate and automated fulfillment of customer documentation.
-
Automated Document Generation: OpsAdmin automatically generates fulfillment documents, streamlining the process and reducing manual effort.
-
Version Control: All documents are version-controlled to preserve historical accuracy. Regardless of changes in the system, regenerated documents will reflect the original information as it existed at the time of enrollment.
-
Template Flexibility: Documents can be uploaded as static PDFs or created as dynamic templates that populate customer-specific data fields directly from the database.
-
On-Demand Regeneration: Users can regenerate documents at any time, with each version accurately reflecting the original state of the data.
-
Tiered Configuration: Documents can be assigned at the market, utility, or plan level. Lower levels inherit required documents from higher tiers, allowing for the creation of document packages that can be emailed or mailed to customers.
-
Language Support: Language variants are supported. Documents are generated in the customer’s preferred language when specified.
 Document Management Structure
![]()
OpsAdmin's Document Management system is organized into six core functions, each serving a specific purpose in the configuration, generation, and distribution of customer-facing documents:
-
Document Types Setup
Defines the categories and usage rules for various document types within the system (e.g., Terms of Service, EFLs, Welcome Letters). -
Document Manager
Centralized location for managing uploaded PDFs or dynamic templates. Enables version control, language variants, and assignment to specific tiers (market, utility, or plan). -
Dynamic Templates
Allows creation of flexible, data-driven document templates that pull customer-specific information directly from the database. -
Document Implementations
Associates specific documents to fulfillment processes, ensuring that the correct documents are included in enrollment or communication workflows.
 Document Types Setup
![]()
The first step in the document fulfillment process is configuring the required types in the Types Setup section. This foundational setup enables users to define which documents are generated and at which tier of the system—Market, Utility, or Plan—they are applied.
Setting up document types provides flexibility in determining the scope and behavior of each document across the system’s hierarchy. In addition, language types can be configured to ensure documents are generated in the customer's preferred language.
To begin configuring the document fulfillment process, two type categories must be defined:
-
Document Types – Specifies the category and purpose of each document (e.g., Terms of Service, Welcome Letter).
-
Languages – Enables multilingual support by allowing documents to be generated in various customer-selected languages.
Accessing and Managing Document Types
To view and manage existing document types:
-
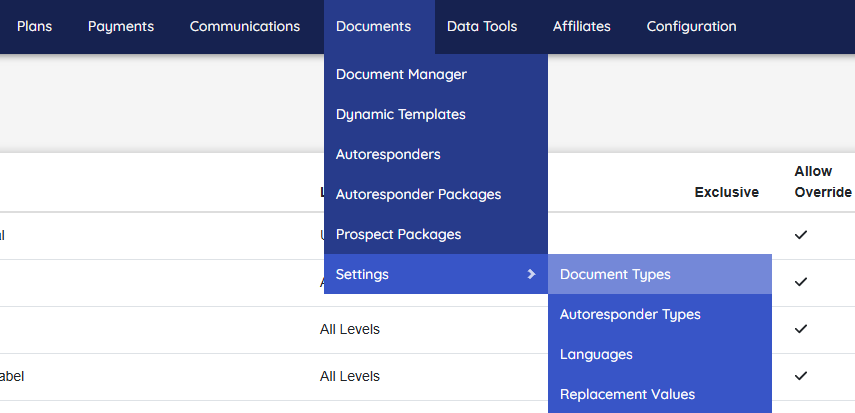
Navigate to the Settings sub-menu.
-
Select Document Types.
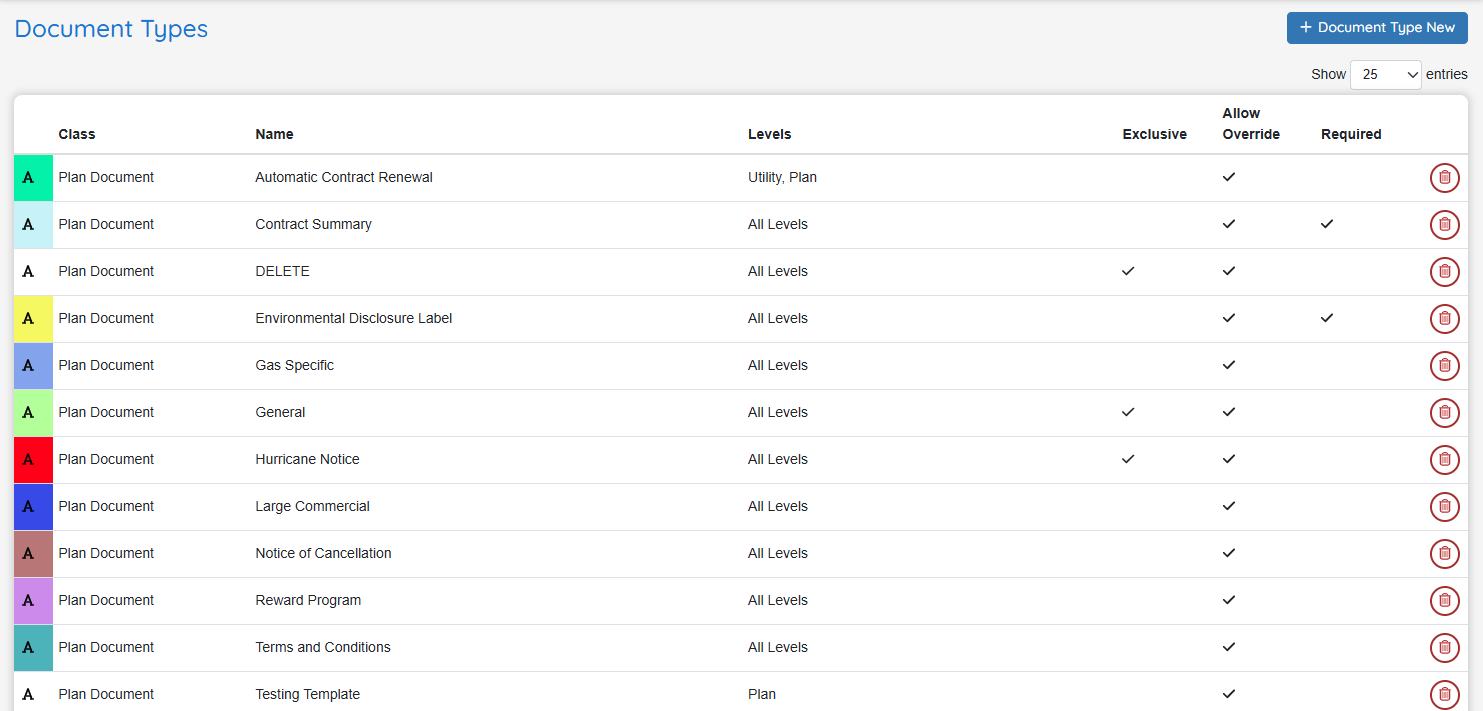
This will open a list of all document types currently configured in the system. Each entry in the list provides detailed information about how the document type is applied and controlled.
The Document Types menu displays the following attributes for each entry:
-
Class – The class may either be Plan or Prospect which determines where the document may be used in the system.
-
Name – The label or title of the document type.
-
Level – The tier of the system the type affects (Market, Utility, or Plan).
-
Exclusivity – Indicates whether the document type is exclusive to a specific level.
-
Overridable – Specifies if the type can be overridden at a lower tier.
-
Required – Indicates whether the document is mandatory for the fulfillment process.
Adding a Document Type
-
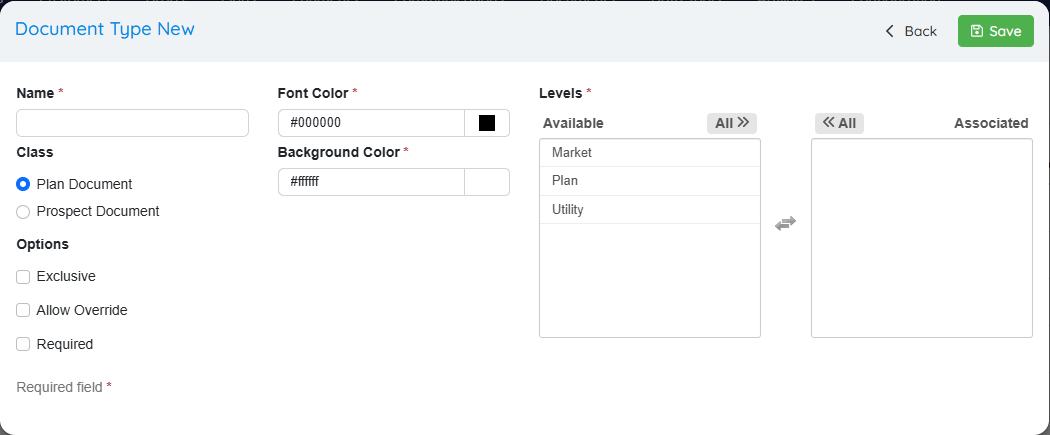
Click "+ Document Type New" to begin creating a new document type.
-
Fill in all required fields marked as mandatory.
-
Click "Save" to finalize and store the new document type.
Document Type Configuration
When creating a new Document Type, complete the following fields with attention to their specific configuration and impact:
-
Name
A text field used to define the name of the Document Type. \ -
Class (or Document Classification)
Select the appropriate radio button to classify the document as either a Plan Document or a Prospect Document. This classification determines which set of system triggers will be applied when managing and executing the document.- Plan Document: Linked to specific energy plans and used within plan-level configurations.
- Prospect Document: Generally associated with contract-related materials tied to sales through the Pricing Matrix.
-
Level Defines where the document type can be configured. Options include:
- Market
- Utility
- Plan
-
Exclusive (Yes/No)
-
Selecting Yes restricts the system to only one document of this type per level (e.g., a single Terms of Service per Utility).
-
Selecting No allows multiple documents of this type to be configured at the same level.
-
-
Allow Override (Yes/No)
-
Selecting Yes allows a lower-level document configuration to override a higher-level one (e.g., a Plan-level TOS can override a Utility-level TOS).
-
Selecting No restricts configuration to a single level only, with no overrides permitted.
-
-
Required
When this checkbox is selected:-
Any modification to documents of this type will trigger the creation of new versions for all affected plans.
-
If a document tied to this type is unpublished, all associated plans will also be unpublished.
-
Once all required fields are completed, click "Save" to add the new Document Type.
Editing and Deleting a Document Type
To Edit a Document Type:
-
Click on the row of the document type you wish to edit.
-
Make the necessary changes to the fields.
-
Click "Save" to apply the updates.
To Delete a Document Type:
-
Click the trash can icon next to the document type you wish to remove.
-
Confirm the deletion when prompted to permanently delete the document type.
 Language Types Overview
![]()
Language Types are used to generate document versions based on the customer's preferred language. You may add as many languages as you plan to support. The system does not do translation, these documents with different languages must be managed by the administrators.
To access Language Types:
-
Navigate to Documents + Settings.
-
Select Languages.
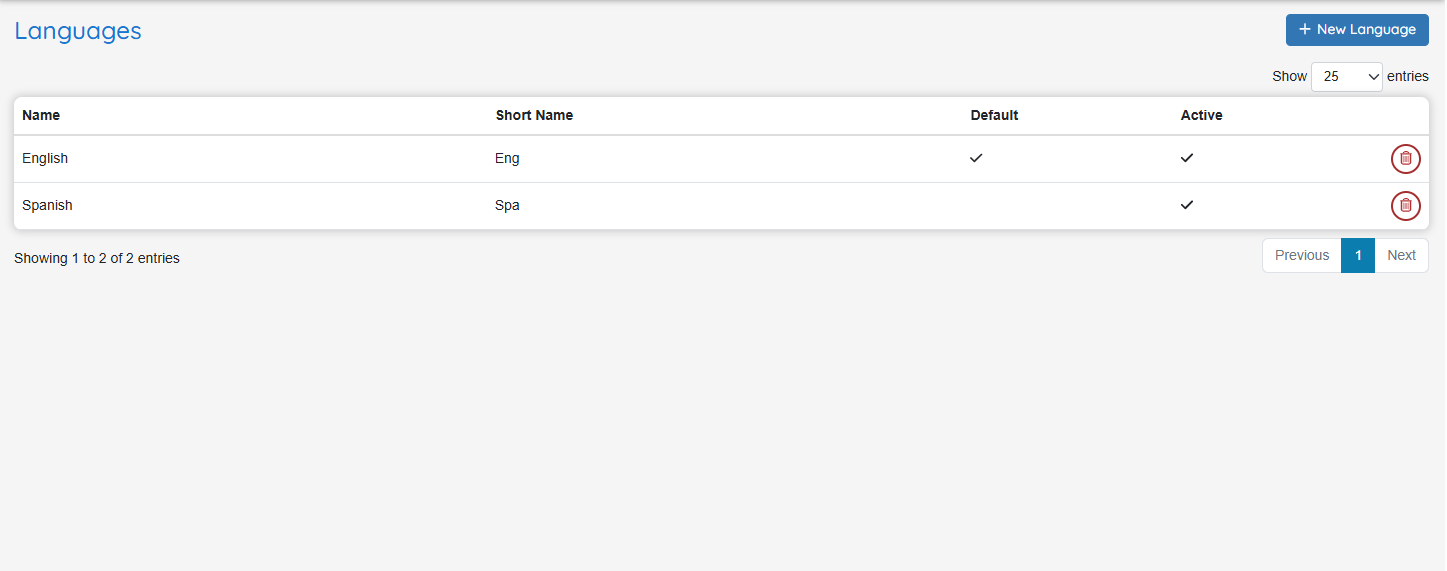
The Language Types menu displays key information for each language variant, including:
-
Name – Full name of the language.
-
Short Name – Abbreviated code or label for the language.
-
Default – Indicates whether the language is set as the default option.
-
Active – Indicates whether the language is available to be used in the system.
Adding a New Language Type
-
Click "+ New Language" to begin creating a new language type.
-
Complete all required fields:
-
Name – Full name of the language (e.g., Spanish, English).
-
Short Name – Abbreviated identifier used in the billing system (e.g., EN, ES).
-
Default – Set this option to indicate the default language for documents. Note: Only one language can be set as the default.
-
-
Click "Save" to add the new language type.
Editing and Deleting a Language Type
To Edit a Language Type:
-
Click on the row of the language type you wish to modify.
-
Make the necessary changes to the fields.
-
Click "Save" to apply the updates.
To Delete a Language Type:
-
Click the trash can icon next to the language type you want to remove.
-
Confirm the deletion when prompted to permanently delete the language type.
*Once documents have been tied to the language, deletion will not be allowed.
 Document Manager Overview
![]()
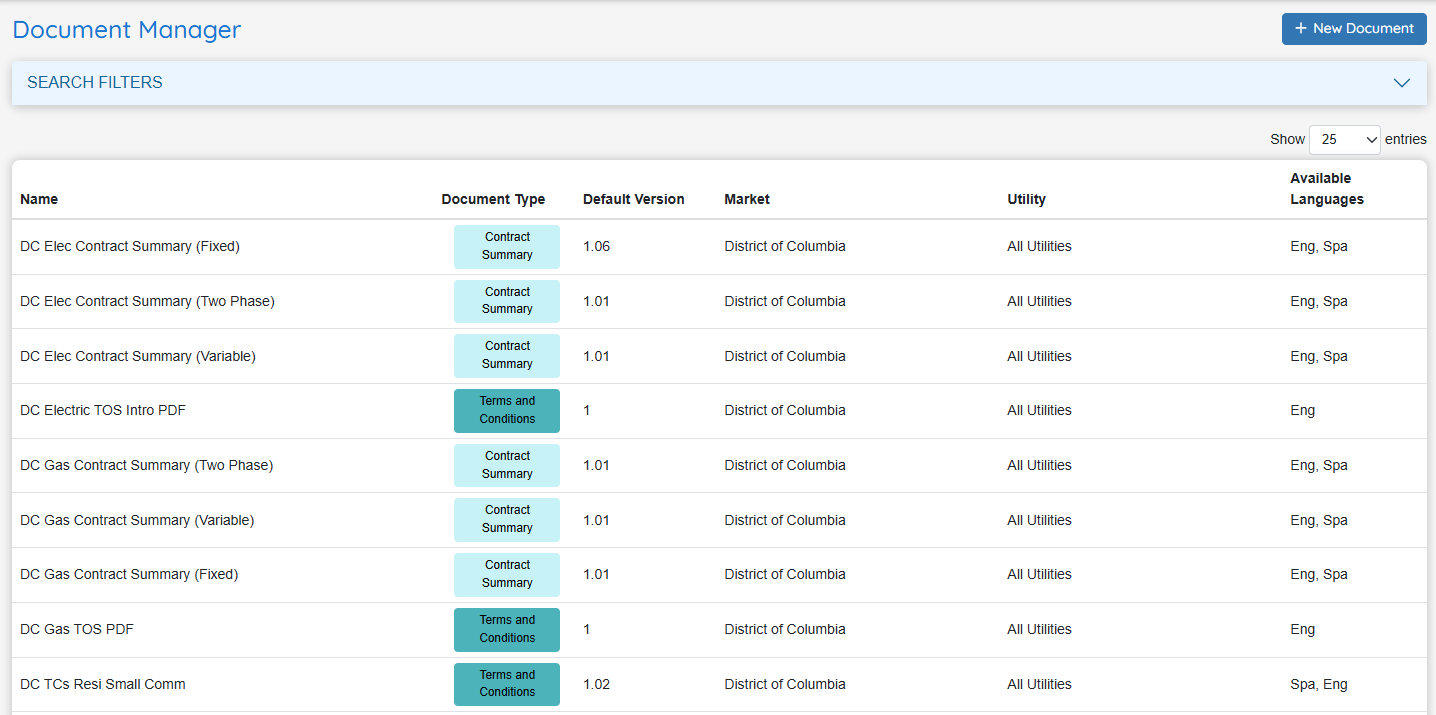
The Document Manager provides centralized access to all documents in the system and supports the following key functions:
-
Add New Documents – Upload and configure new documents for use.
-
Add New Document Versions – Create and manage updated versions of existing documents.
-
Add Language Variants – Upload additional versions of a document in other languages that have already been created externally.
-
View Version History – Review the complete history of changes for each document.
-
Download Document Preview – Download a preview copy of the document for review.

Accessing the Document Manager
To access the Document Manager, navigate to the “Document Manager” sub-menu.
The Document Manager displays a list of all documents in the system, including the following details:
-
Name – The name of the document.
-
Document Type – The type classification assigned to the document.
-
Current Version – The most recent version of the document.
-
Markets Associated – Markets where the document is available.
-
Utilities Associated – Utilities linked to the document.
-
Available Languages – Language variants that have been uploaded for the document.
A search filter is available to help quickly locate specific documents.
Adding a New Document
-
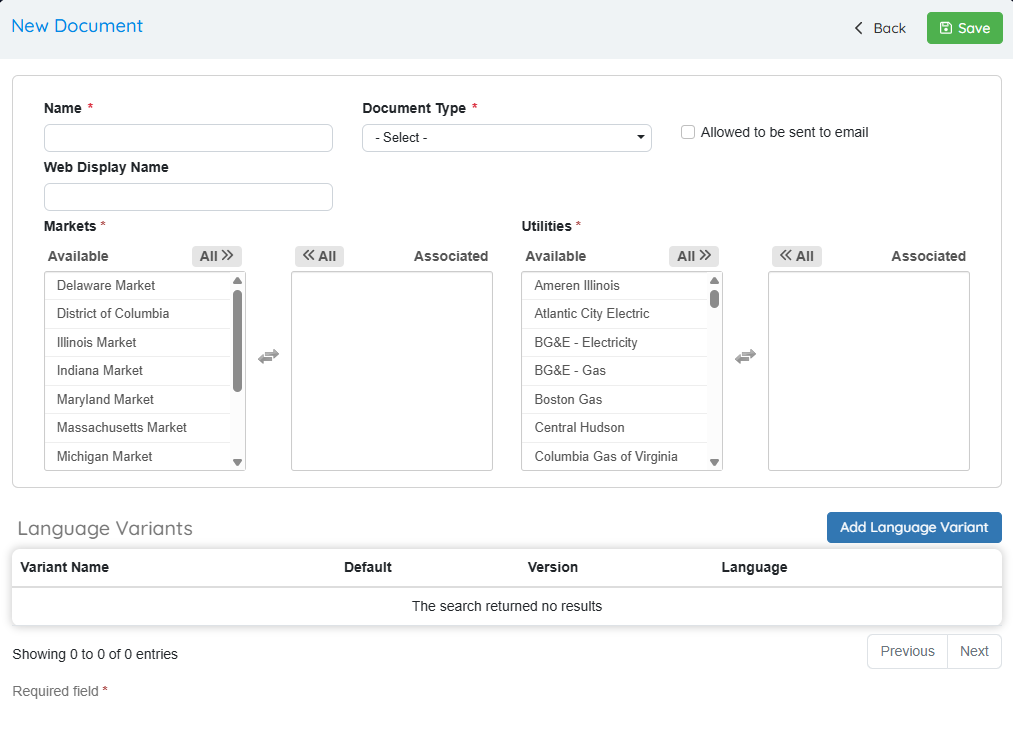
Click "+ New Document" to begin the document creation process.
-
Complete all mandatory fields in the main document form.
-
Click "Add Language Variant" to upload at least one language version (required to proceed).
-
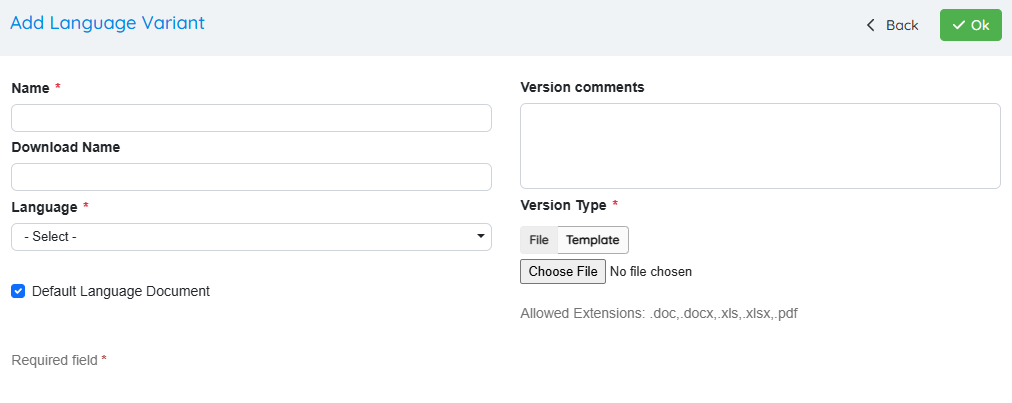
In the language variant window, complete all mandatory fields:
-
Select the Version Type:
-
File – Upload a PDF version of the document.
-
Template – Choose a user-created dynamic template.
-
-
-
Click "OK" to add the language variant. It will appear in the document’s variant list.
-
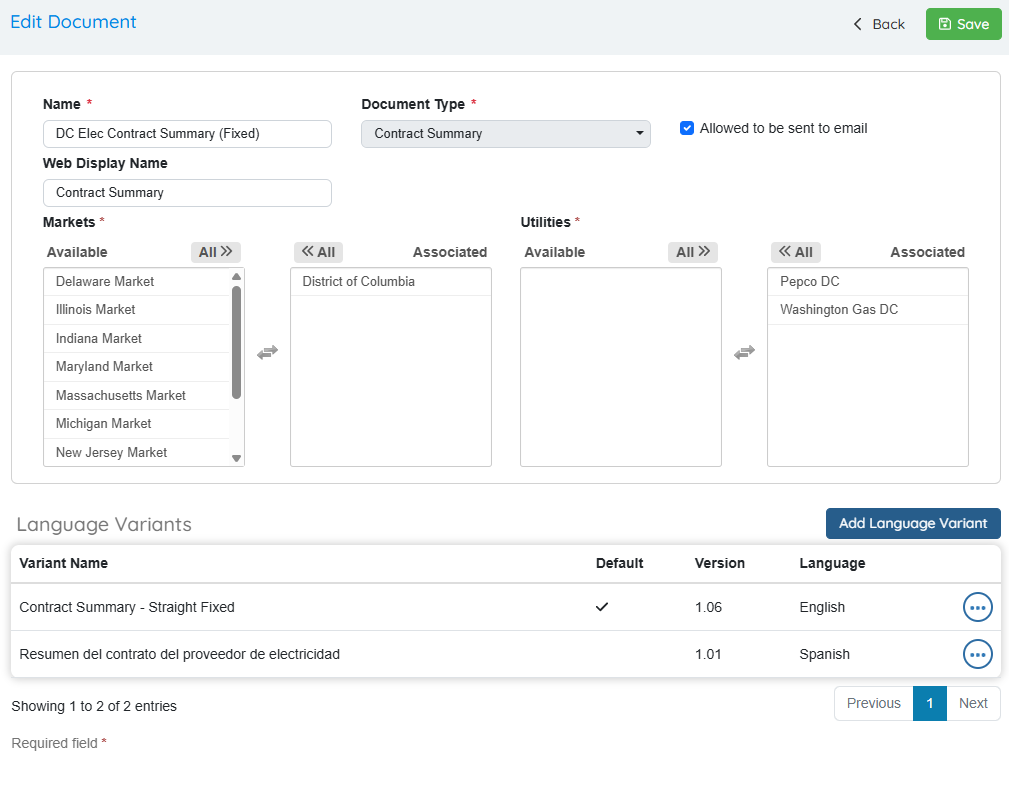
Once at least one language variant is added, click "Save" to complete the document setup.
Note: A document cannot be saved without at least one language variant.
Selecting a Dynamic Template
When adding a document, you have the option to use a dynamic template instead of uploading a static file.
To use a dynamic template:
- In the Add Language Variant menu, select "Template" as the version type.
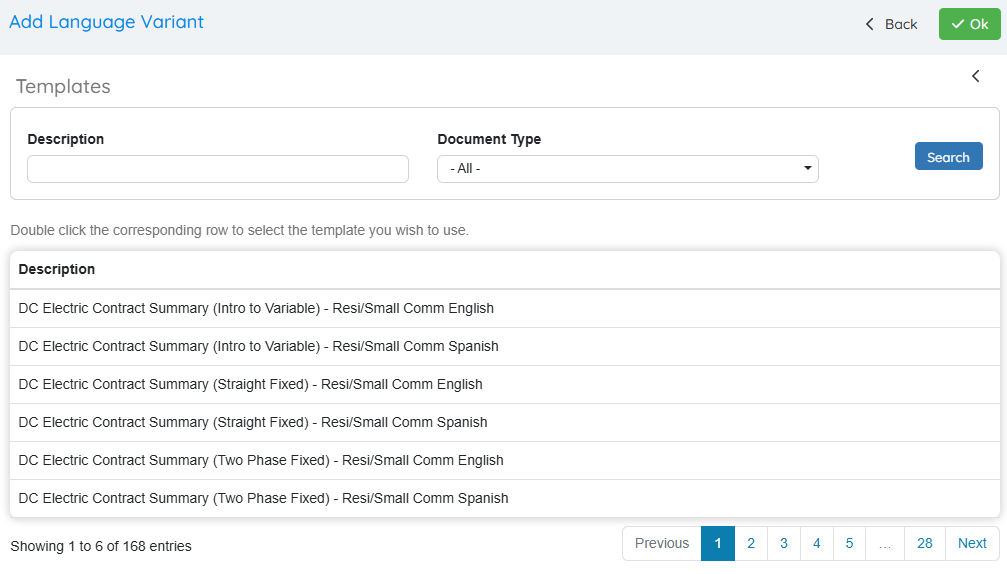
- Click "Select" to open the template selection window.
-
A list of available dynamic templates will appear.
-
Use the search bar to filter templates by description or type.
-
Click on the row of the desired template to select it.
-
Click "OK" to confirm your selection.
Adding a New Version of a Document
To add a new version to an existing document:
-
Locate and select the row of the document you wish to update.
-
Click the three-dot icon on the right side of the row.
-
Select "Add Version" from the menu.

-
Complete any mandatory fields as needed.
-
Choose the Version Type:
-
File – Upload a new PDF version of the document.
-
Template – Select a user-created dynamic template.
-
-
Click "OK" to confirm.
-
In the original pop-up window, click "Save" to finalize and add the new version.
Viewing Version History
To view the version history of a document:
-
Select the row of the document you wish to review.
-
Click the more icon (three dots).
-
Choose "Show Version History" from the menu.

On the next screen, a list of all versions will be displayed, along with any comments entered during the creation of each version.
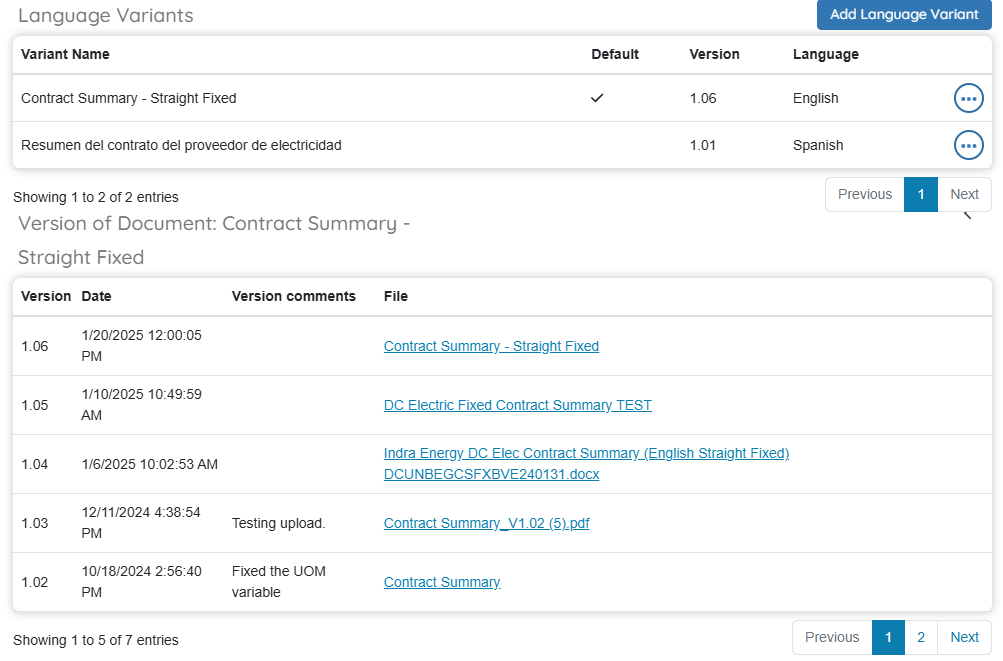
Note: As part of OpsAdmin’s versioning functionality, all previous versions of a document are retained. This allows documents to be regenerated with the original data as it existed at the time of the enrollment.
Generating a Document Preview
To preview a document:
-
Select the row of the document you wish to preview.
-
Click the more icon (three dots).
-
Choose "Download Document" from the menu.

This action will generate and download an HTML or PDF preview of the selected document.
 Dynamic Templates
![]()
Dynamic Templates are HTML-based documents that automatically convert to PDF format when processed.
Key features include:
-
A full content editor that offers two editing modes:
-
A Word-style interface for easy, visual editing.
-
An HTML mode for direct code-based editing.
-
-
Support for dynamic variables, which can be inserted into the template to automatically populate data during document generation.
These templates allow for flexible, data-driven document creation that adapts to various customer and plan-specific inputs.
Accessing Dynamic Templates
To access and manage dynamic templates:
- Navigate to the “Dynamic Templates” sub-menu.
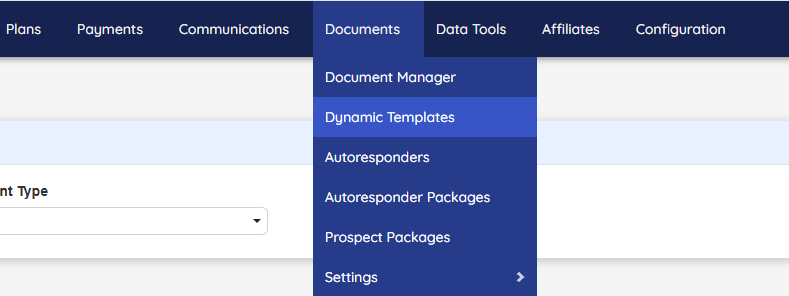
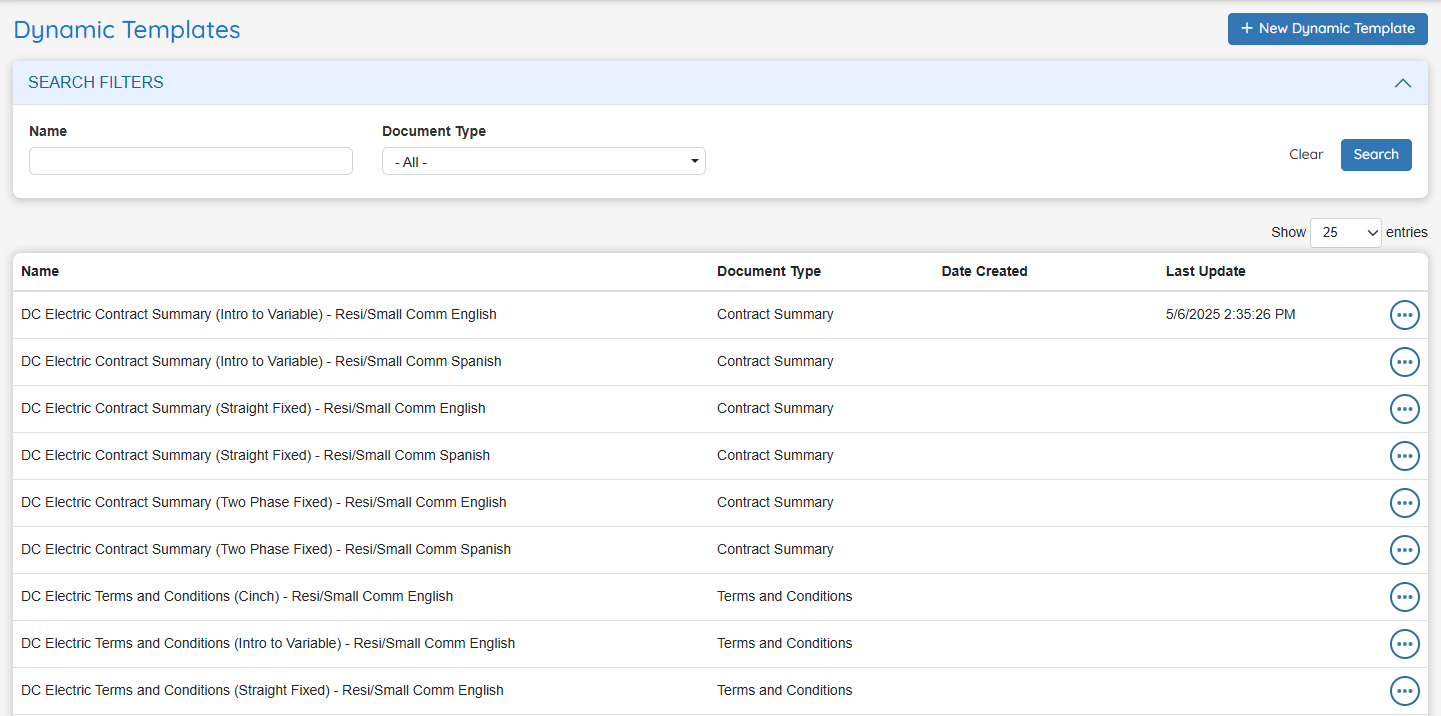
This section displays a list of all dynamic templates currently available in the system.
Note: Each template must have a Document Type defined. This is required in order to use the template as a language variant when creating or updating documents.
Creating a Dynamic Template
-
Click "+ New Dynamic Document" to begin creating a new template.
-
Complete all fields in the Administration section, including required details such as name, document type, and description.
-
Build the document content using either:
-
The Word-style interface for visual editing, or
-
The HTML editor for direct code input.
-
-
Click "Save" to store the dynamic template in the system.
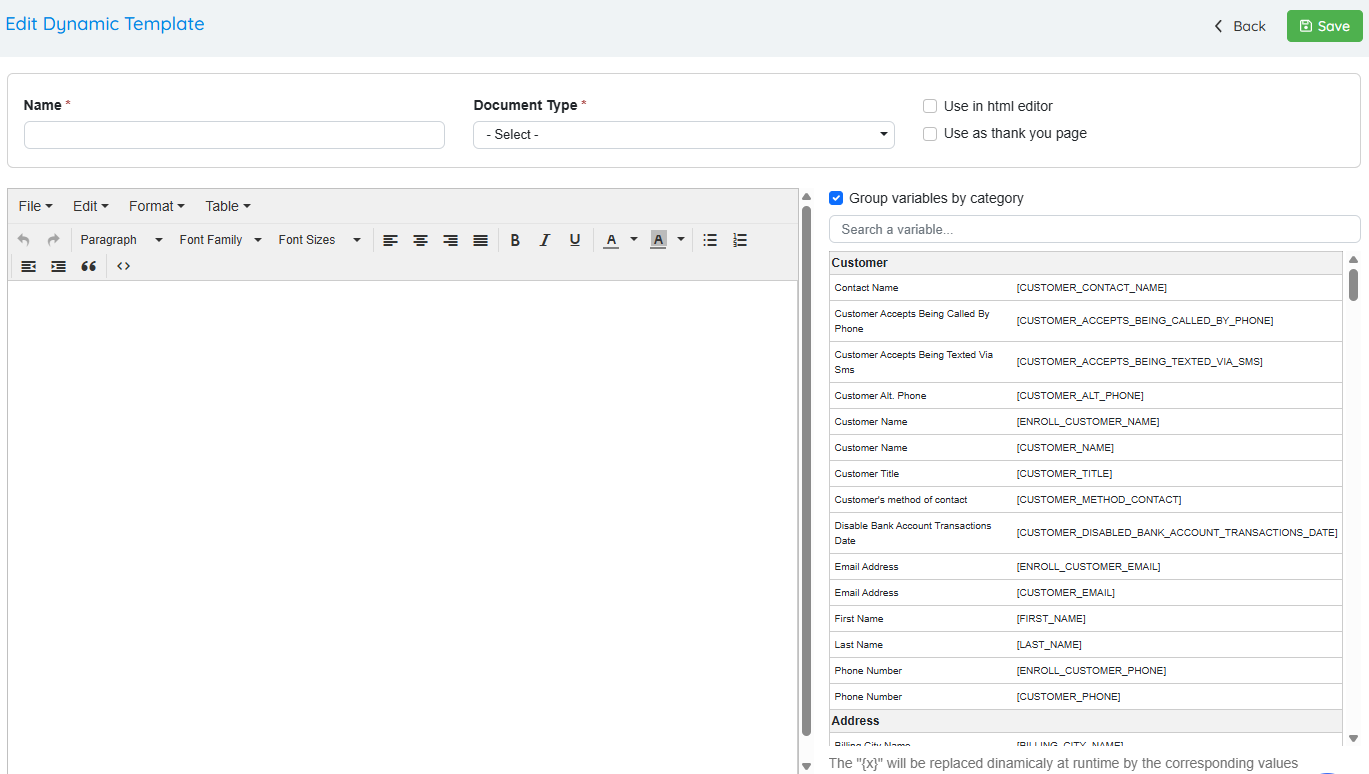
Creating a Dynamic Template – Field Descriptions
When creating a new Dynamic Template, the following fields and options are available:
-
Name
A text description used to identify the template. -
Document Type
Associate the template with a specific document type. This is required for the template to be used as a language variant in document creation. -
Use in HTML Editor
Enables editing the template directly in the HTML editor. -
Use as Thank You Page
Allows the template to be selectable as a Thank You page when configuring a plan.
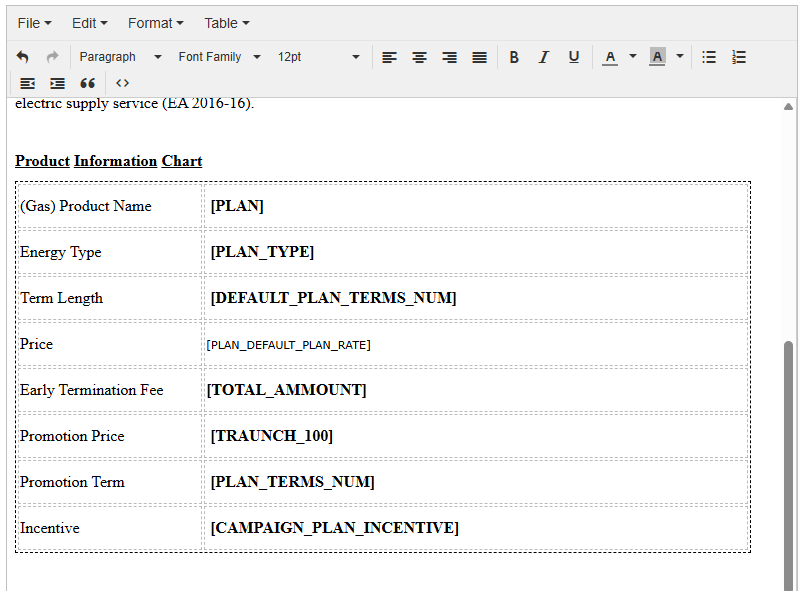
- Text Field
The main content area for building the document. This can be used for direct input in the Word-style interface.
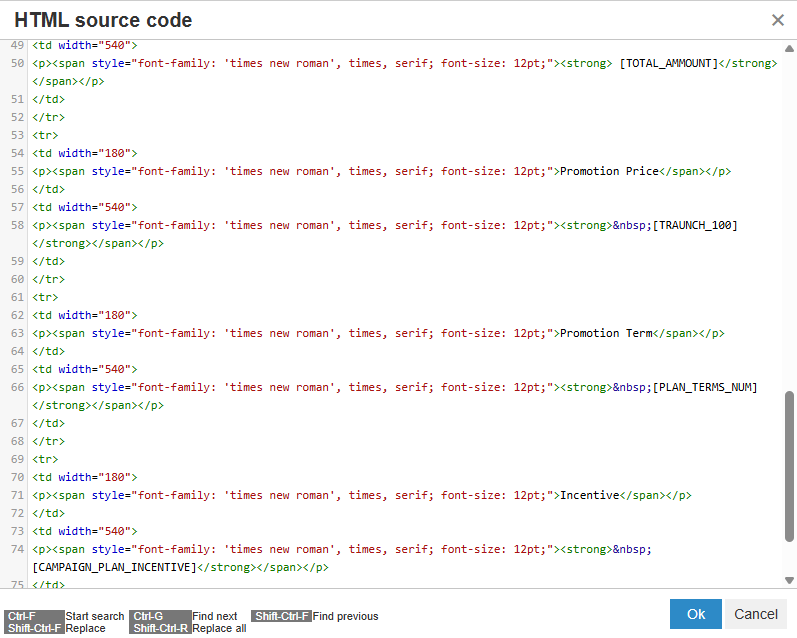
- Source Code Editor
Opens the HTML editor for advanced formatting and custom logic.
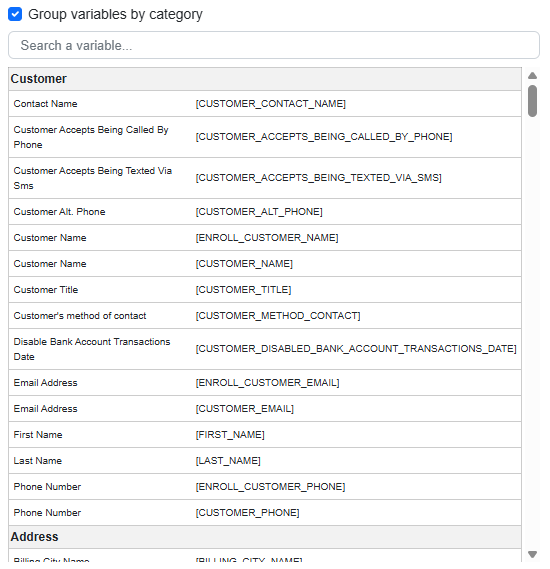
- Available Variables
A list of system-defined variables that can be inserted into the document. These variables dynamically pull specific customer data from the database during document generation.
Editing and Deleting a Dynamic Template
To Edit a Dynamic Template:
-
Select the row of the template you wish to modify.
-
Make the necessary changes in the editor.
-
Click "Save" to apply your updates.
To Delete a Dynamic Template:
-
Click the more icon (three dots) next to the template.
-
Select "Delete" from the menu.
-
Confirm the deletion in the pop-up prompt to permanently remove the template.
Generating a Sample PDF
When building dynamic templates, it is important to preview how the content will render as a PDF before assigning the document to a specific level in the system.
To generate a sample PDF:
-
Click the more icon (three dots) next to the dynamic template you wish to preview.
-
Select "Generate Sample PDF" from the menu.
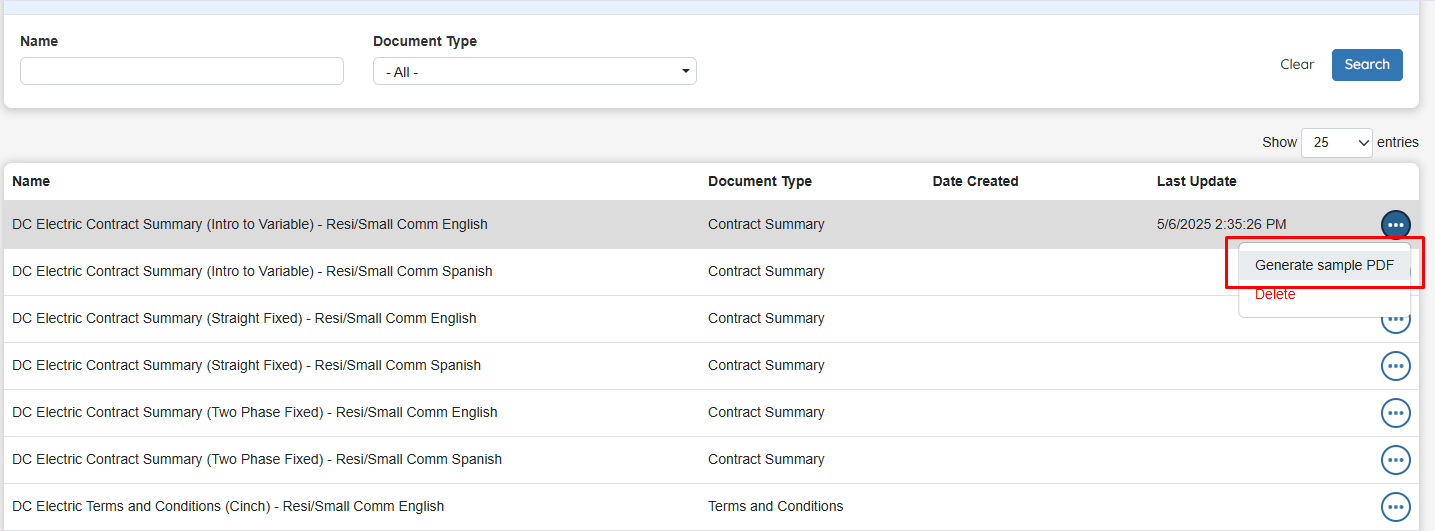
- Enter a confirmation number for a customer to populate the document with sample data. Note: You can find the confirmation number on the Enrollment Manager page.

- Click "Generate". A PDF file will begin downloading in your browser.
- Open the downloaded file to view the rendered document.
 Document Implementation
![]()
Documents in the system can be implemented at three levels: Market, Utility, and Plan.
-
Documents can be inherited from higher levels, allowing for the creation of document packages that are delivered to customers via mail or email.
-
The default document flow follows this hierarchy: Market → Utility → Plan.
-
This flow can be customized by configuring the Document Type settings, which determine how documents behave at each level and whether they allow overrides or exclusivity.
Document Properties Explained
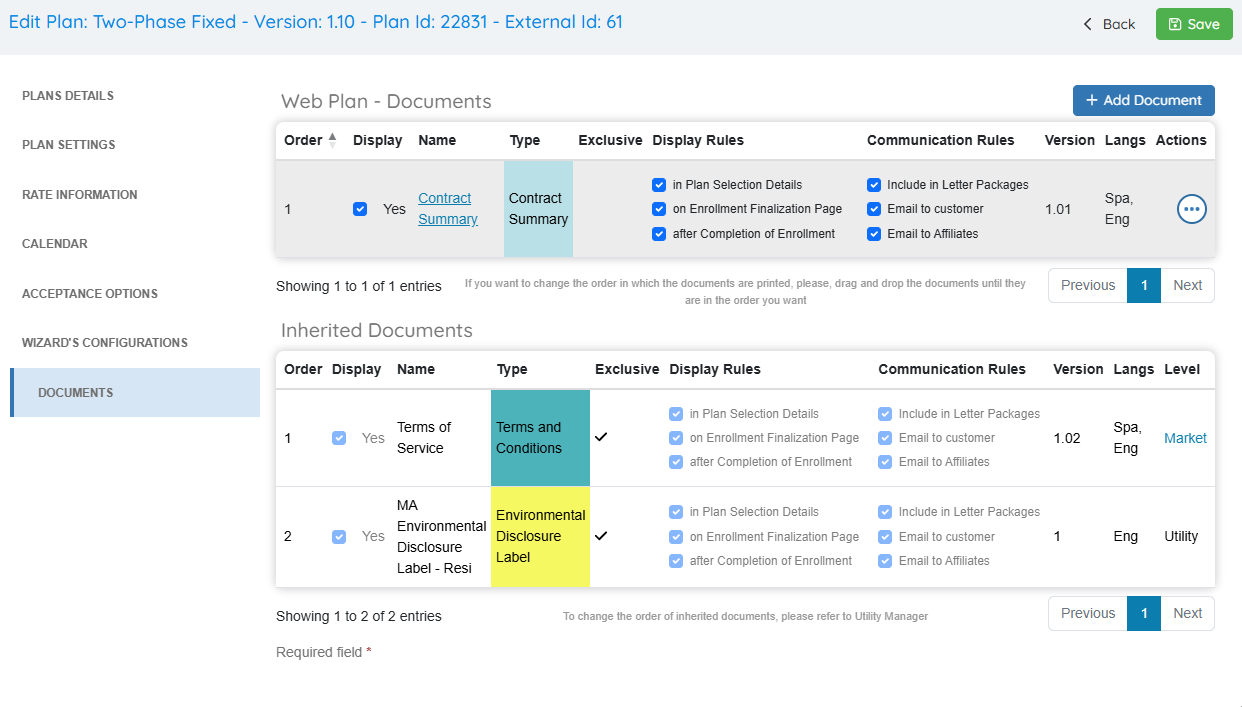
Document Properties define how and when documents are displayed or delivered during the enrollment process. These properties are grouped into two main categories:
Display Rules
Control where the document is shown within the enrollment interface:
-
On Enrollment Finalization Page
If enabled, the document will be available for the customer to view on the final screen of the enrollment process. -
In Plan Selection Details
If enabled, the document will be visible to the customer on the plan selection screen when the related product is selected. -
After Completion of Enrollment
If enabled, the document will be accessible to the customer on the confirmation page after enrollment is completed.
Communication Rules
Control how the document is distributed via email or mail:
-
Include in Letter Package
If selected, the document will be included in physical or digital letter packages generated using the autoresponder package function. -
Email to Customer
If selected, the document will be emailed directly to the customer as part of the communication workflow. -
Email to Affiliates
If selected, the document will be sent to the affiliate for record-keeping or compliance purposes.
Adding Documents to the Market or Utility Level
If you need to manage a document across all plans within a specific Market, the Market level is the appropriate location. This allows for centralized management of documents that apply only to that Market.
Note: Updating a document at the Market level will automatically update all associated plans and Utilities within that Market.

To add a document to the Market level:
-
Select the appropriate Market.
-
Click on Associated Documents.
-
Click "+ Add Document" and choose the document you wish to associate with all plans in the selected Market.
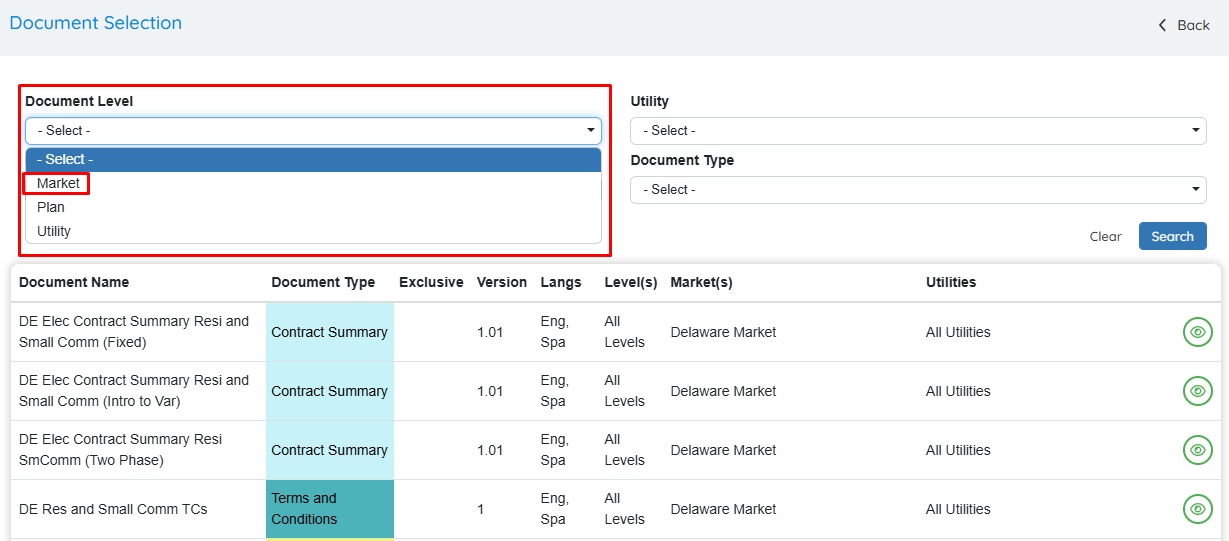
- (optional) If you want to make this a Utility level document, you must select Utility Level and then select the Utility it will apply to.
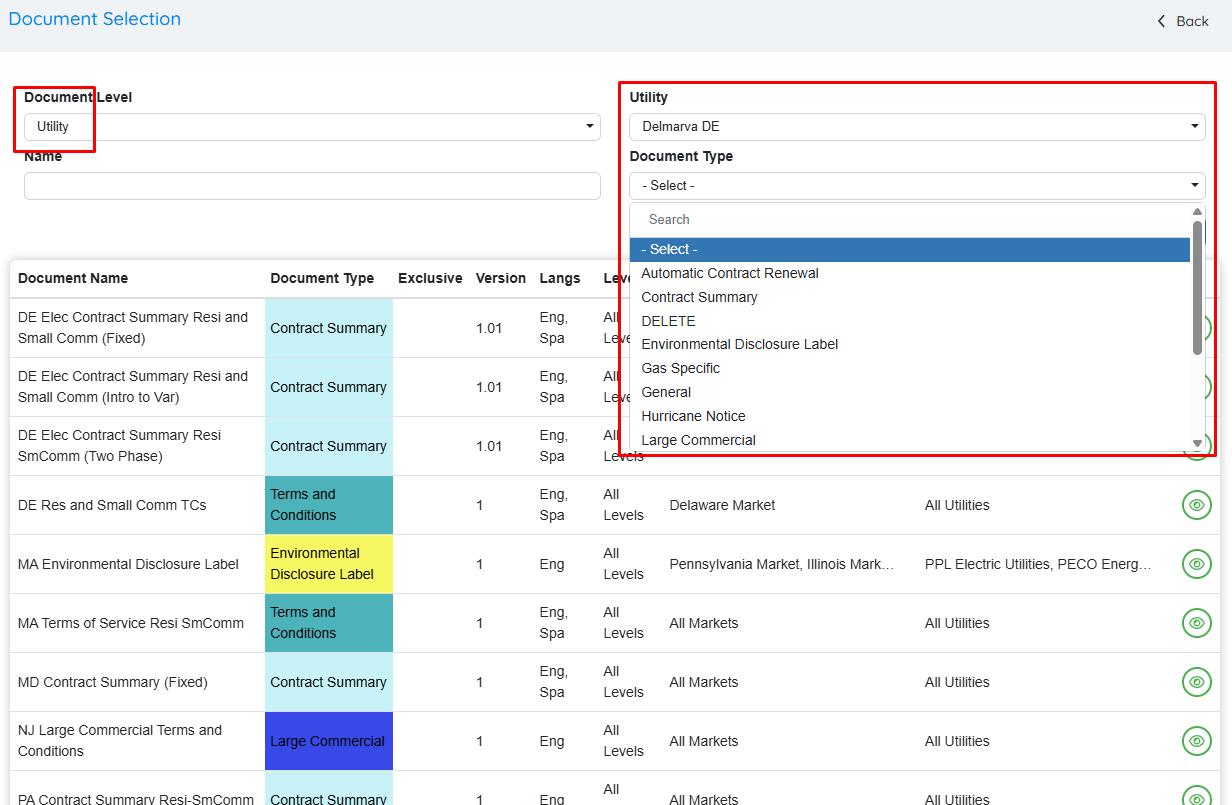
-
Select the Document Type you want to associate.
-
Click "Save" to finalize the configuration.
Managing Market and Utility Documents
After documents have been added, they will appear in the "Associated Documents" section at the bottom of the selected Market or Utility.
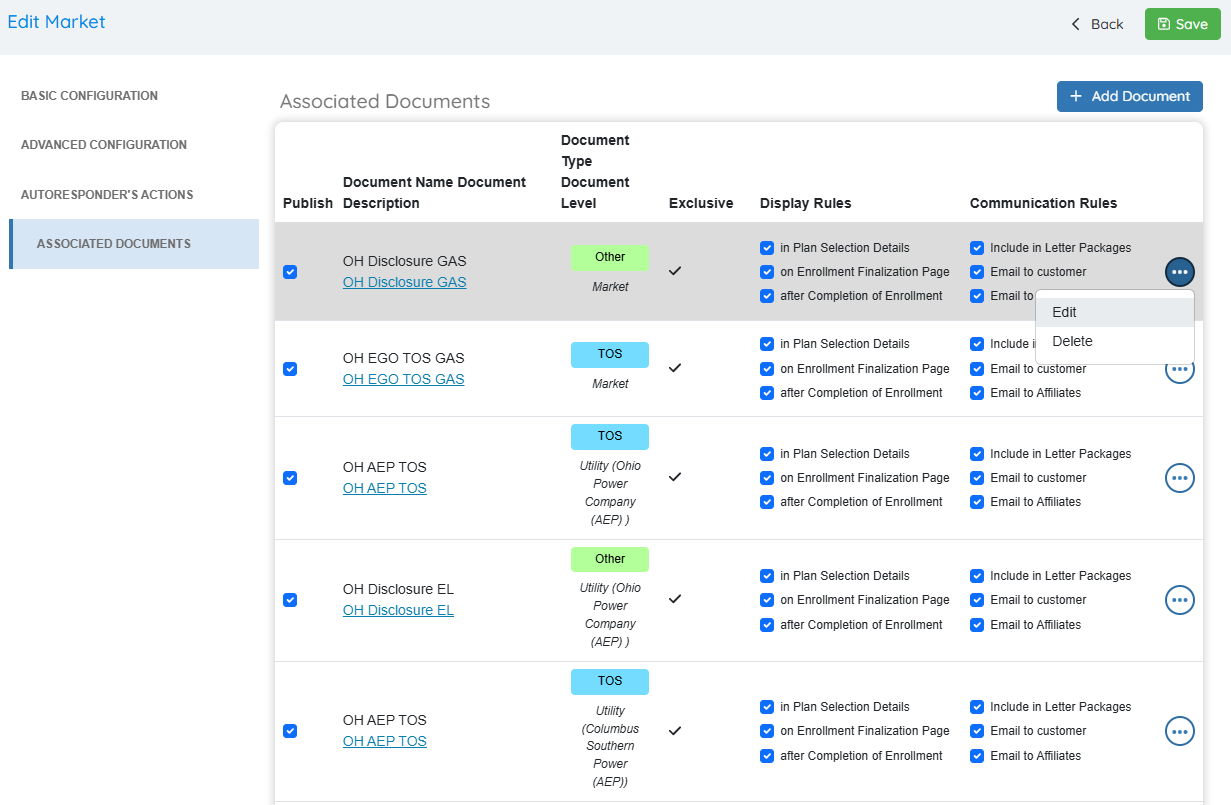
Key functions within this menu include:
-
Publish Checkbox
Ensure the "Publish" checkbox is selected. If unchecked, the document will not be displayed to users or generated in any customer communication. -
Add, Edit, or Delete Documents
Use the controls in this menu to manage existing documents or add new ones at the Market or Utility level. -
Quick Rule Adjustments
Modify Display Rules and Communication Rules quickly by checking or unchecking the relevant boxes directly in the list view.
This menu provides a convenient way to manage document visibility and behavior across all plans within the selected Market or Utility.
Editing and Deleting Associated Documents
To Edit an Associated Document:
- Click the pencil icon next to the document you wish to edit.
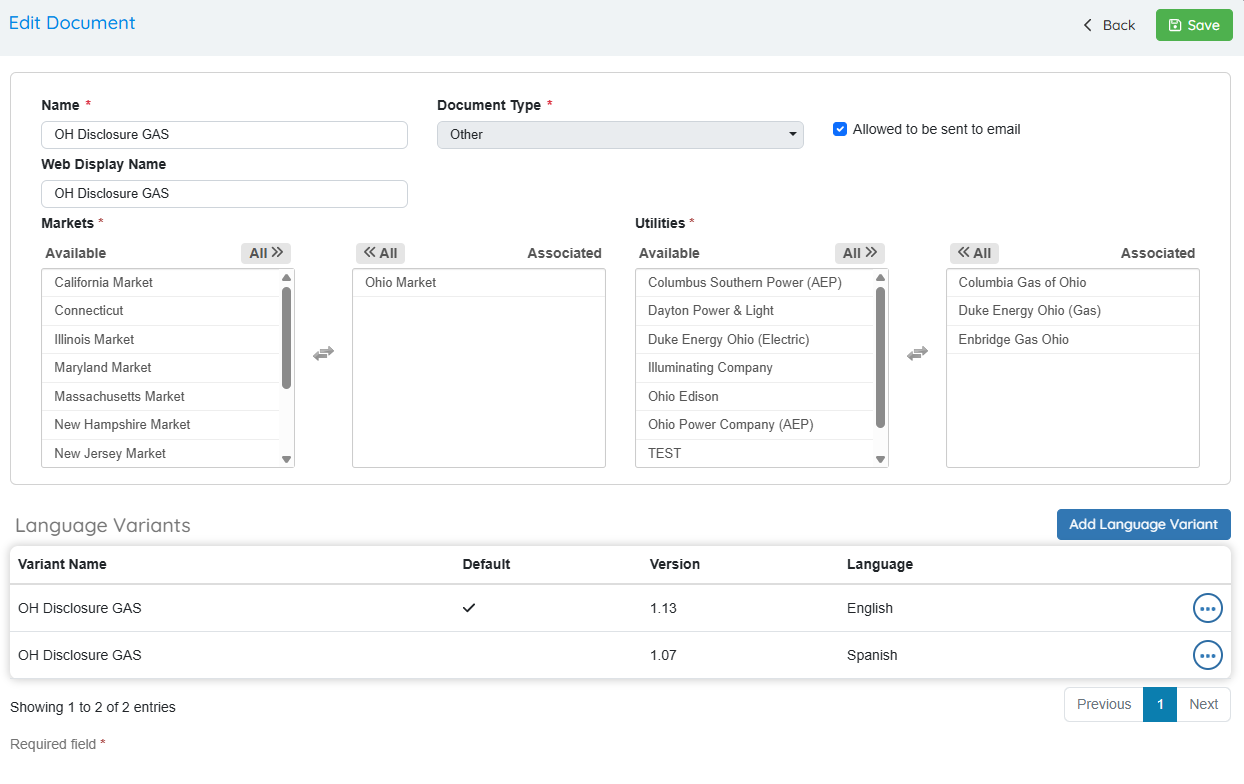
- Make the necessary changes, such as adding a new language variant or document version.
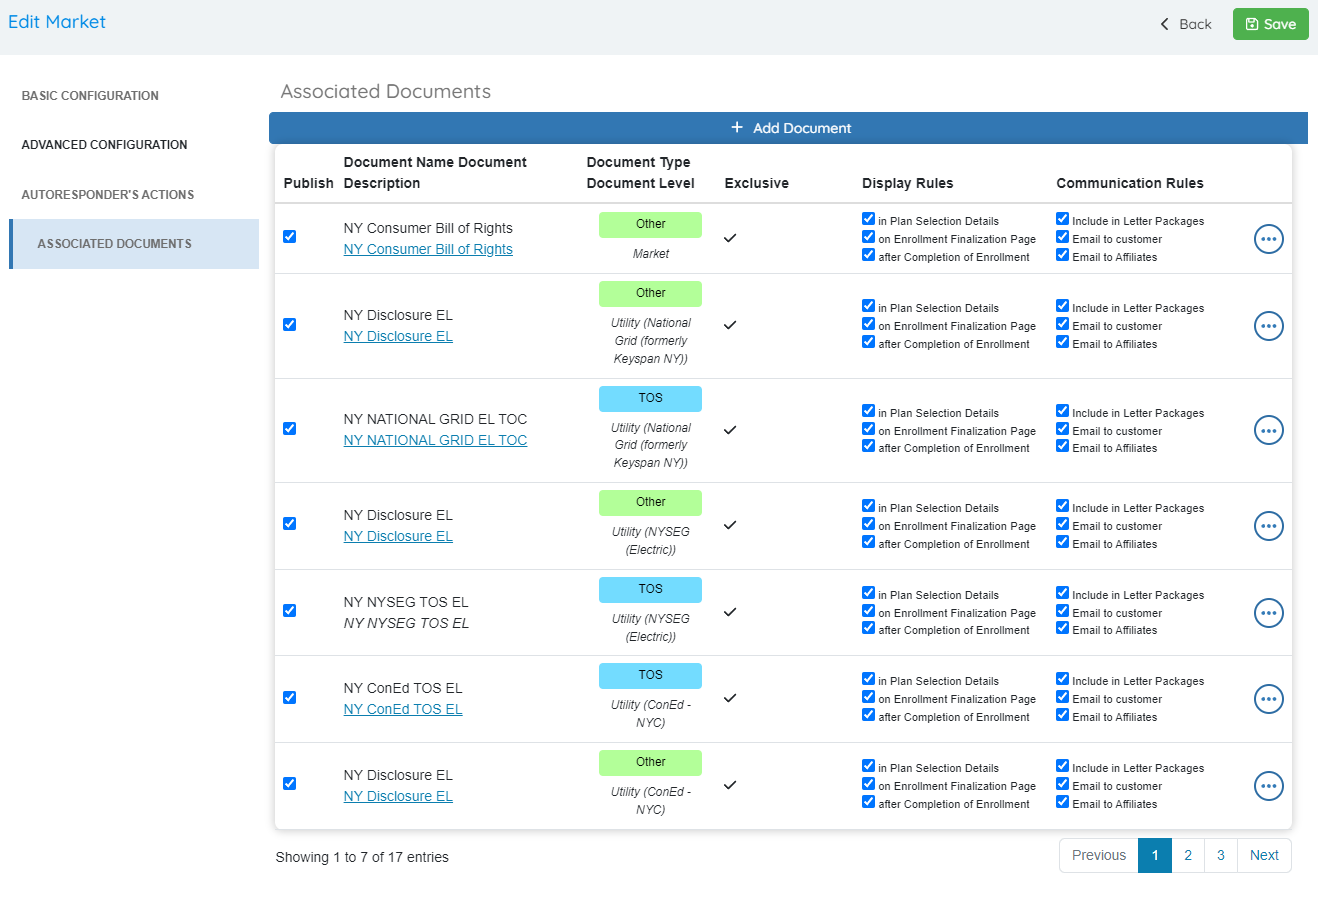
- Click "Save" to apply the updates.
To Delete an Associated Document:
- Select the document you wish to remove and confirm the deletion when prompted.
Note: This action only removes the document association from the Market or Utility level—it does not delete the document from the system.
Adding a Document to a Plan
To add a document at the Plan level:
-
Navigate to the “Web Plans” sub-menu.
-
Select the appropriate Utility.

-
Choose the desired Plan, then click on the “Documents” tab within the plan.
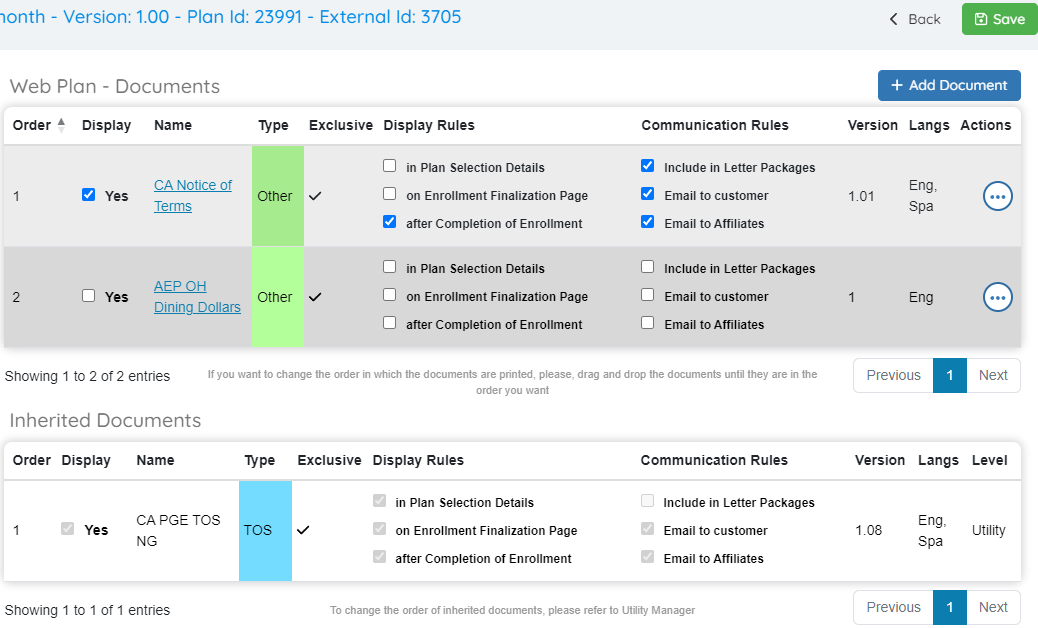
- This section will display any documents inherited from the Market and Utility levels.
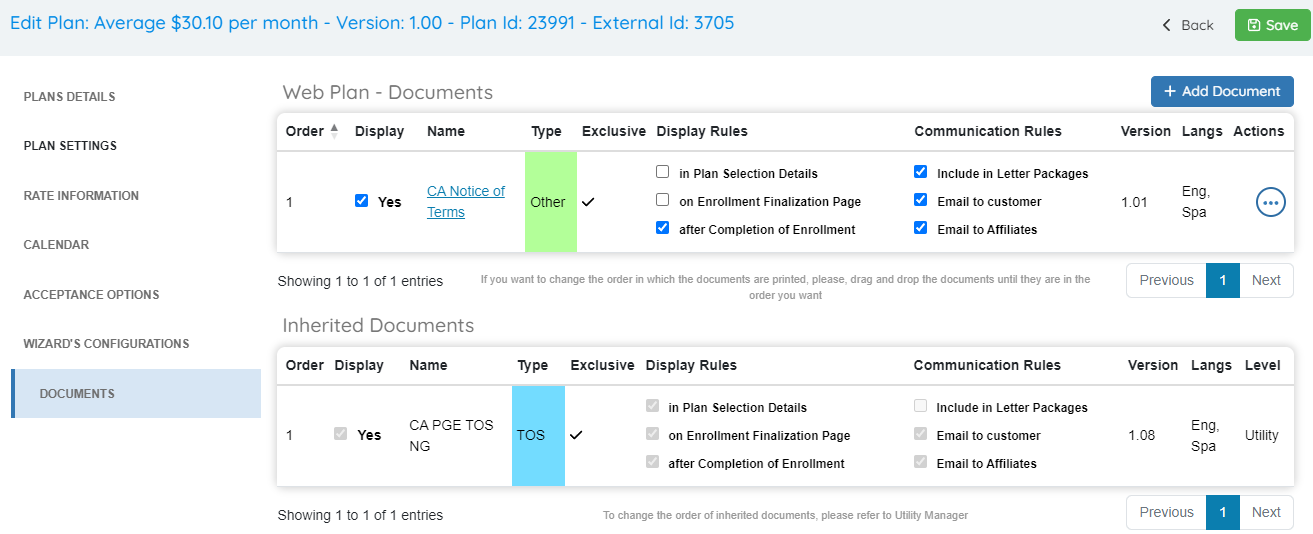
-
Click “Add Document” to associate a new document directly with the selected plan.
-
Complete any required steps, including selecting variants or versions, and click "Save" to finalize.
-
Choose the document you wish to add from the available list.
-
Complete the required Document Properties, including display and communication rules.
- Click "Save" to proceed.
- OpsAdmin will display a warning that a new version of the plan will be created.
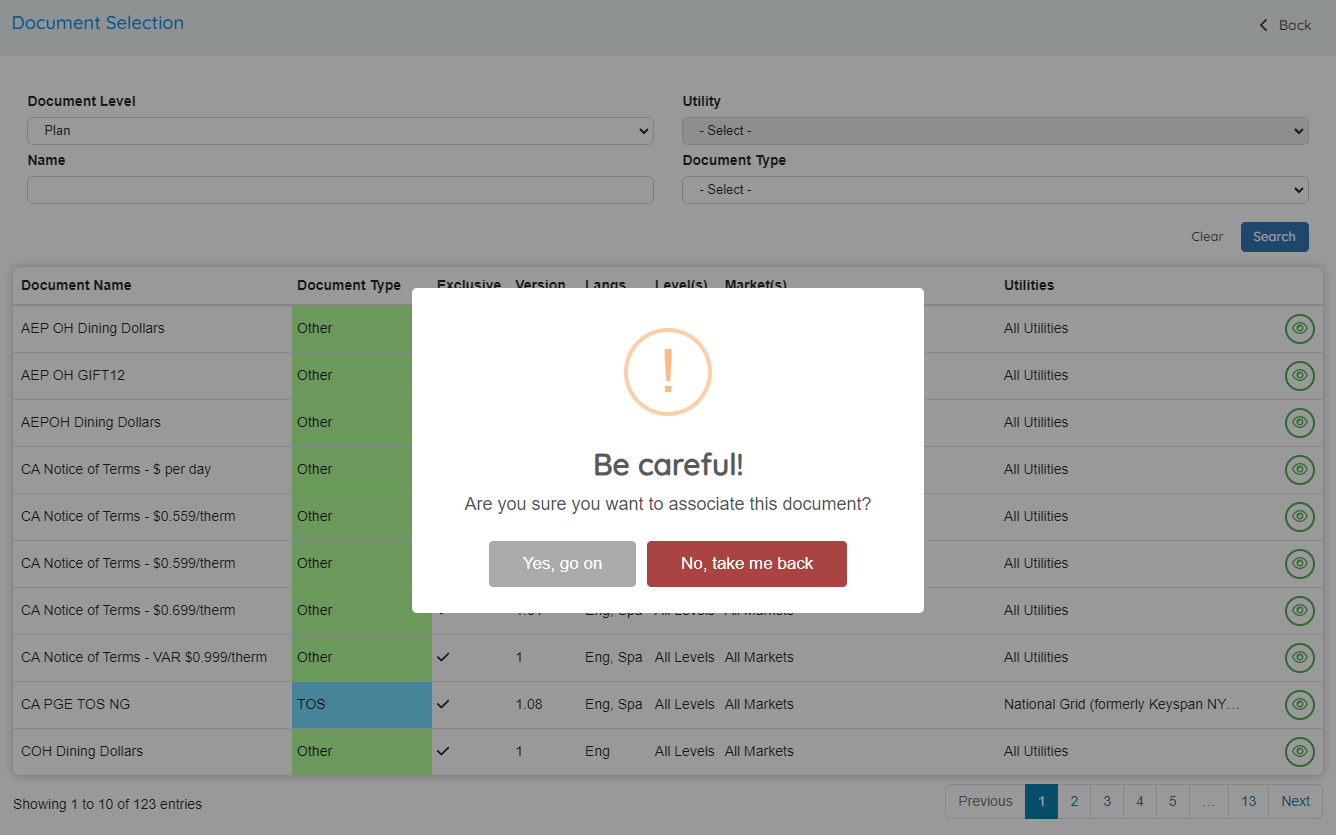
- Confirm the action to finalize the document addition and generate the updated plan version.
Editing a Plan-Level Document
-
In the Documents tab of the selected plan, click the more icon (three dots) next to the document you want to edit.
-
Make the necessary changes, such as adding a new version or language variant.
-
Click "Save" to apply the changes.
Note: Saving changes will prompt OpsAdmin to create a new version of the plan. Be sure to confirm when prompted.